從零開始的Discord機器人(5) - 增加互動
本篇會介紹如何使用Components,並實際建立Button與Select Menu這兩種Components。
到上一篇為止,我們已經弄好了機器人的架構。所以這次的主題不是關於機器人的本體,而是著重於可以讓使用者互動的功能。
本篇將會介紹Button、Select Menu這兩種Component、如何使用Action Row將Component加入機器人的回應中,並且在使用者互動時機器人能夠接收並回應。
1. 在這之前,什麼是Component?
MessageComponent,或簡稱為Component,是一系列可以在機器人傳送的訊息中加入的可互動物件,例如在訊息下方顯示可以按的按鈕,或是可以選擇的選單,甚至是表單的輸入框(這部分會在以後的章節提到)。
在使用按鈕、選單等Components時,會需要使用到一種特別的Component:Action Row。所有其他的Components都需要被裝進Action Row這種作為容器的Component內,最後將它們塞進訊息的components內送出。這部分會在後面提到。
2. Button
就像SlashCommandBuilder ()一樣,Discord.js為建立Components提供了各自的Builder可以使用。要建立一個Button,當然就有ButtonBuilder ()可以使用囉。以下是一個ButtonBuilder ()的範例:
const button = new ButtonBuilder()
    .setCustomId('submit')
    .setLabel('Click')
    .setStyle(ButtonStyle.Primary);
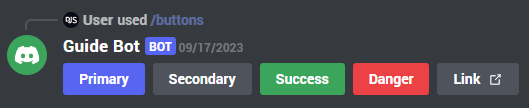
每一個Component都需要一個CustomId,當與Component互動觸發InteractionCreate事件時,可以使用CustomId作為判斷。此外,可以為Button設定五種樣式,分別是:
- Primary:最常見的藍色按鈕。
- Secondary:灰色按鈕。
- Success:綠色按鈕。
- Danger:紅色按鈕。
- Link:一樣是灰色按鈕,不過Link的用法較為特殊。
Link顧名思義是作為超連結使用,當使用Link時,會需要加上一個url,並且不能擁有CustomId,因為點擊Link的按鈕不會觸發InteractionCreate的事件。以下是Link按鈕的範例:
const button = new ButtonBuilder()
    .setLabel('discord.js docs')
    .setURL('https://discord.js.org')
    .setStyle(ButtonStyle.Link);
3. Select Menu
接下來要介紹的是Select Menu,就像Button一樣,Select Menu也有類似的SelectMenuBuilder ()可以使用。以下是一個Select Menu的範例,我們以範例來解釋用法:
const select = new StringSelectMenuBuilder()
    .setCustomId('starter')
    .setPlaceholder('Make a selection!')
    .addOptions(
        new StringSelectMenuOptionBuilder()
            .setLabel('Bulbasaur')
            .setDescription('The dual-type Grass/Poison Seed Pokémon.')
            .setValue('bulbasaur'),
        new StringSelectMenuOptionBuilder()
            .setLabel('Charmander')
            .setDescription('The Fire-type Lizard Pokémon.')
            .setValue('charmander'),
        new StringSelectMenuOptionBuilder()
            .setLabel('Squirtle')
            .setDescription('The Water-type Tiny Turtle Pokémon.')
            .setValue('squirtle'),
);
這是一個StringSelectMenuBuilder (),也就是每一個選項都是一個單純的字串。和Button以及其他Component一樣,我們需要為Select Menu設定一個CustomId,並且我們還可以使用setPlaceholder ()來設定使用者未選擇選項時顯示的文字。
既然是Select Menu,最重要的當然是選項,在這裡可以使用addOptions ()來將選項加進來,而Discord.js也有提供StringSelectMenuOptionBuilder ()方便我們建立選項。
在每個選項中,都必須要用setLabel ()設定選項顯示的文字;同時也必須要用setValue ()幫選項設定一個值,這樣機器人才能根據值做出相應的動作。最後,你可以使用setDefault ()將選項設為預設選項。
除了可自訂選項的StringSelectMenuBuilder ()之外,還有以下幾種Select Menus:
- UserSelectMenuBuilder:選擇使用者
- RoleSelectMenuBuilder:選擇身分組
- MentionableSelectMenuBuilder:選擇使用者或身分組
- ChannelSelectMenuBuilder:選擇頻道
這幾種Select Menus由於不需要自己設定選項,所以少了addOptions ()可以使用。另外,ChannelSelectMenuBuilder ()可以使用setChannelTypes ()自訂想要顯示在選項的頻道類型。想了解更多關於ChannelType的類型可以點擊這裡。
4. 如何送出Component
我們已經順利建立Components了,但還只差一步就能送出這些Components。前面有提到,所有其他的Components都需要被裝進Action Row這種作為容器的Component內,最後將它們塞進訊息的components內送出。所以首先要新增一個Action Row,既然Action Row也是一種Component,很理所當然的也有對應的ActionRowBuilder ()可以使用:
const row = new ActionRowBuilder ()
    .addComponents (button);
這應該是全部裡面最簡單的Component了,只需要建立新的Action Row並使用addComponents ()將其他Components加進來就行。值得注意的是,一個Action Row內可以放入多個Buttons,但只能放入一個Select Menu,並且當放入Select Menu之後就不能再放入Button了。
而最後要將Action Row加進回應也很簡單,我們只需要這麼做:
interaction.reply({
    content: "你想要機器人回應的內容",
    components: [row],
})
請注意components放的是一個array,也就是說可以放入多個Action Rows,當機器人送出回應時就會得到多行的Components了。
5. 接收互動並回應
到目前為止,我們已經順利送出Component了,接下來就要接收這些Component的觸發事件了。首先讓我們回顧一下interactionCreate.js:
module.exports = {
    name: 'interactionCreate',
    async execute (interaction) {
        let reaction;
        if (interaction.isChatInputCommand()) {
            reaction = interaction.client.commands.get(interaction.commandName);
        }

        try {
            if (interaction.replied) return
            reaction.execute(interaction);
        }
        catch (error) {
            console.error(error);
        }
    }
}
在這裡,我們根據接收到的interaction類型,如果收到的是斜線指令,從client.commands內找到指令並執行相應的動作。而Component其實跟指令的邏輯差不多,同樣是確認類型,找到對應的檔案,並執行相應的動作。首先,我們先將確認類型補上去:
module.exports = {
    name: 'interactionCreate',
    async execute (interaction) {
        let reaction;
        if (interaction.isChatInputCommand()) {
            reaction = interaction.client.commands.get(interaction.commandName);
        }
// ---------------START---------------
        else if (interaction.isButton()) {
            reaction = interaction.client.buttons.get(interaction.customId);
        }
        else if (interaction.isStringSelectMenu()) {
            reaction = interaction.client.selectMenus.get(interaction.customId);
        }
// ----------------END----------------
        try {
            if (interaction.replied) return
            reaction.execute(interaction);
        }
        catch (error) {
            console.error(error);
        }
    }
}
跟指令不同的是,指令是從interaction.commandName取得名稱,而Component是從interaction.customId取得,這和我們前面所做的設定是一致的。
接下來,指令的部分是從client.commands內取得的,還記得我們前面有這個東西嗎:
client.commands = getCommands ('./commands');
我們在這裡可以稍微改寫一下getCommands (),寫成一個功能差不多的getComponents ()來幫我們取得需要的檔案(當然你也可以用自己的方法取得,這裡為參考):
function getComponents (dir) {
    let components = new Collection();
    const componentFiles = getFiles(dir);

    for (const componentFile of componentFiles) {
        const component = require("." + componentFile);
        components.set(component.name, component);
    }
    return components;
}
有了getComponents ()之後,我們就能根據自己的需要擴充類似的Collection,並建立存放這些檔案的資料夾:
client.buttons = getComponents ('./buttons');
client.selectMenus = getComponents ('./selectMenus');
最後,只要新增每個Component對應的檔案即可。格式與新增指令非常類似,只不過我們只需要execute ()的部分就好。我們以上面的Button為範例:
module.exports = {
    name: "submit",
    async execute (interaction) {
        // 在這裡實作你想要機器人做的事情
    }
}
6. 接下來要做的事情
到目前為止,我們介紹了Components並實際建立了按鈕與下拉式選單,之後我們可能會把表單(Modal)的部分補完,或是介紹Embeds的使用方法(吧)。
感謝你看到這邊,我們下次見。